Thursday, November 11, 2010

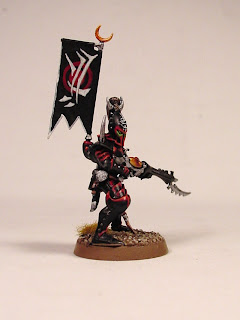
Finished Dark Eldar Warriors

1st 5 Warriors are done. Here's some pics:


Here's how I painted the flesh, since it's bound to come up.

Basecoat Dheneb Stone. Wash with Ogryn Flesh. Highlight with a 50:50 mix of Elf Flesh and Skull White, keeping the darker color in the recesses. Wash again with Ogryn Flesh. Highlight with the 50:50 mix of Elf Flesh and Skull White. Highlight the raised areas with thinned Skull White, almost a 1:2 or 1:3 mix of paint to water, and slowly just build up to a pure white on the highest areas.

I need to seal these guys with another round of gloss and dull coat and they'll be good to go. On to the last 5.

~iPaint

Monday, November 8, 2010

Painting Tutorial: Warhammer 40k Dark Eldar Warrior, Scheme 1

Here's the first painting tutorial, as promised

This tutorial assumes that the model has been assembled and basecoated black.


Step 1: Edge armor plates in Mechrite Red. Basecoat the skin sash in Elf Flesh. Basecoat the Splinter Rifle, highlight the under-armor, and edge highlight the shoulder armor with Codex Grey. Basecoat the arm sash in Goblin Green.

Step 2: Edge highlight armor plates with Blood Red. Wash the skin sash with Ogryn Flesh. Wash the arm sash, under-armor, and Splinter Rifle with Badab Black.

Step 3: Edge highlight armor plates with Solar Macharius Orange. Wash the skin sash with Gryphonne Sepia. Highlight the arm sash with Goblin Green. Basecoat the Splinter Rifle's power supply with Shining Gold.


Step 4: Highlight the skin sash with elf flesh. Wash the Splinter Rifle's power supply with Gryphonne Sepia. Paint the eyes and highlight the armor edges just underneath the eyes with Goblin Green. Basecoat the ammo packs with Bleached Bone.

Step 5: Wash the skin sash with Ogryn Flesh. Wash the ammo packs with Devlan Mud. Wash the Splinter Rifle's power supply with Gryphonne Sepia again. Highlight the eyes and armor edges just underneath the eyes with a 1:1 mix of Goblin Green and Sunburst Yellow. Paint the wire on the model's left shoulder with Sunburst Yellow (2-3 light coats for a smooth finish is what I did since it's such a small piece to paint).

Step 6: Paint all metal areas with Chainmail. Highlight the Splinter Rifle's power supply with Shining Gold. Basecoat bone details and dagger handle with Bleached Bone and give it a quick highlight of Skull White. Once the Chainmail has dried, wash the 2 cylinders on the belt with Badab Black.

Seal the model and base as desired, and the model is ready to bolster the ranks of your growing Kabal.

Have fun and let me know how it works for you.

~iPaint

The Dark Eldar Approach!

So, I picked up a copy of the new Dark Eldar codex at my FLGS, as well as a box of the new Kabalite Warriors.

Within a few hours I had the squad ready to start painting, and a few hours later I had my first test mini finished to my tabletop standard.


Once I knock out a tutorial for this paint scheme, I'll have these guys up on a popular online auction site, so keep an eye out.

~iPaint

Friday, November 5, 2010

Painting Tutorial: Warhammer 40k Ork

Here's a tutorial for how I paint my Warhammer 40k Orks. I'd consider this my tabletop standard.

On to the tutorial:

Step 1: Codex Grey highlights for black cloth and boots. Basecoat leather straps in Bestial Brown, skin in Gnarloc Green.

Step 2: Highlight skin with 3:1 mix Gnarloc Green to Bleached Bone.

Step 3: Basecoat teeth, fingernails, straps, pouches in Khemri Brown.

Step 4: Chainmail for metal.


Step 5: Devlan Mud wash over entire model.

Step 6: Stipple Mithril Silver on metal. Highlight teeth, fingernails, stitching with Bleached Bone.

Step 7: Watered down Solar Macharius Orange is applied to create rust effects. Gryphonne Sepia is applied to a few places where the rust is once the Macharius Orange is dry.

Step 8: Paint the eyes Blood Red. Seal the model and base to your preference.


And there you have it, one more Ork Boy for the gathering Waaaagh! Let me know how the tutorial worked for you.

~iPaint

Can My Blog Sue Me For Negligence?

Yes, yes, I have neglected this blog for far too long, and I hope to start making better use of it in the near future. Start looking for painting tutorials in the following weeks.

Also, doors are still open for commission work if you happen to find your way here because of that.

Thursday, July 1, 2010

Back From the Dead!

Wow, so I'd almost forgotten that I had a blog running here. Anyway, guess there's always time to dust it off and keep going.

I've opened my doors to a commission service, and this will function as my pseudo-website to post any progress I make.

I'll have to mess around with posting pics later.

Friday, February 12, 2010

The Joys of Batch Painting

So, it's everyone's favorite method of painting: batch painting. Hours upon hours of the same color applied to the same parts of the same models, until your entire batch is complete! What could be better? /sarcasm

While it is a bit of a drag, I've found the rewards of batch painting (and having a place to go to where other like-minded individuals gather to perform a similar task as yours) to be quite adequate, despite the mind-numbing process involved.

That said, I have been slowly working my way through, oh, 27 guardsmen with assorted weaponry in one batch. The nice thing is that I get to see the entire group progress as a whole and finish as a whole. The bad is that fewer models are finished at an earlier time. I have not decided if this is a quicker process yet, but at least it will be a consistent one.

I have posted a few updates over at Warseer, most notably a TOE for the Arnan 317th Mechanized Infantry Regiment. I am pleased with the way the army is shaping up, and cannot wait until my next batch of Chimeras arrive. They're the older kit with the accessory sprue included (GW be damned for dropping this wonderful frame of plastic goodness out of its newer kits), but that means 5 sets of wheels and track links to assemble. Not too bad considering I'm not very fond of the new GW kit coming in March. The slimmed side skirts are nice, but not a big enough draw to make me miss out on the accessory kit with the track armor, et al. Plus, the turret is a bit on the boxy side, something that made me decide to forgo the standard Leman Russ kit for my MBT's in favor of the newer, sleeker, and in my opinion, improved version that is the Leman Russ Demolisher kit. Versatility in a box? Yes please.

But that's five more Chimeras to add to the list of armor that needs to be painted to finish off the mechanized elements of my IG. They should keep me busy. I also need to figure out where I am going to get my Griffons from. I may go all out for some Forge World models, or I can try my hand at converting the new Basalisk kit and see where it takes me. Either way, I have plenty on the table as it is.

On a similar note, I'm finding it very difficult to keep thoughts of Goff Kans arriving on my paint table to be sold on eBay come March. I'm really tempted to try my hand out on some conversions and painting techniques, and I think the new Kans kit will be a perfect opportunity to try some techniques if I decide to pick up my Orks again.
Tuesday, February 9, 2010

So It Begins...

Well, if you are new to this blog, it will be a continuation and supplement of several painting logs I maintain over at Warseer. They consist of my Imperial Guard andTyranid armies, and will eventually play host to my Ork army when I get my act together to take some pics and start painting it again. Keep an eye out for the greenskins in March when the new Kans arrive.

I guess this will simply become a place where I can post my musings, rants, tutorials, thoughts, schemes, and other such nonsense related to the world of Warhammer 40k, and to a lesser extent the greater world of miniature gaming.

Keep an eye out for updates here, or feel free to drop by Warseer from time to time. They've got some good stuff over there.

~iPaint